Tips for the Resourceful World Traveling Baker
As a nomad, I couldn’t live without baking bread. In South American vacation rentals, I learned to make great bread under any circumstance. Here are my tips.
NOTE: I don’t receive any compensation for the product recommendations in this post. Also, I need to give credit where credit’s due. I’ve leaned heavily on the Bake With Jack YouTube channel and blog for my skills as a baker and many of the recipes I use every day.
I got into baking bread, as many did, at the start of the pandemic. Before that, I could make a decent chocolate chip cookie and that was about it.
Once I started, I couldn’t stop. I made several loaves a week. I made cinnamon rolls, chocolate bread, and braided orange zested bread with blueberries (among many, many other things). Bread is a staple and a routine that comes second only to coffee.
That’s why, when we decided to leave home and travel for a year in South America, I was determined one way or another to keep it going.
Making Bread Abroad
Bread, as part of your travel repertoire, has several things going for it. It has very few ingredients. At its simplest it needs only flour, water, yeast, and salt. No filling your nomadic “pantry” with a library of ingredients you’ll rarely use. It also requires very few specialized gadgets. There’s a good chance you’ll have what you need in even the most basically stocked vacation rental kitchens. (More on this in the following sections.)
In theory, bread is simple. But depending where you go, you might face obstacles you never imagined possible. The challenges you face will depend on what region of the world you travel to. Most of the challenges I describe here are ones I faced in South America. If you go to China, however, you will find that most people don’t even have ovens! That’ll change what you can reasonably accomplish. (They steam their bread).
So here are my hard-won tips and tricks for overcoming a variety of hurdles a traveler might face so you can impress your new friends abroad with some great bread!
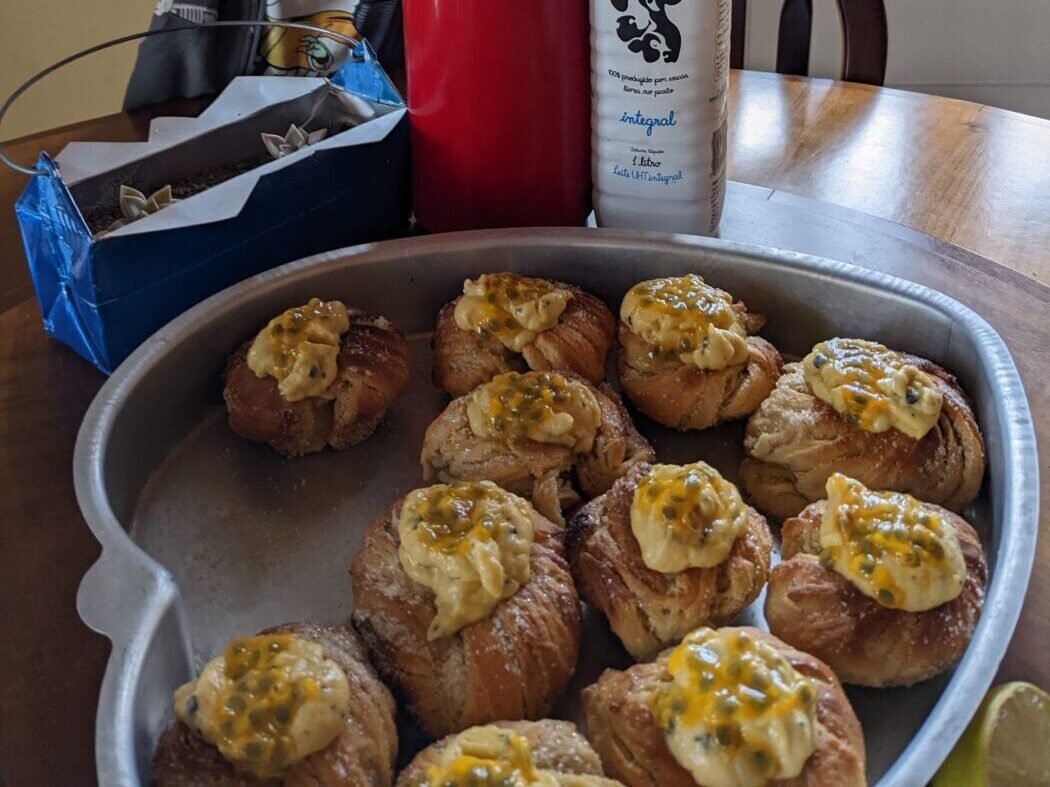
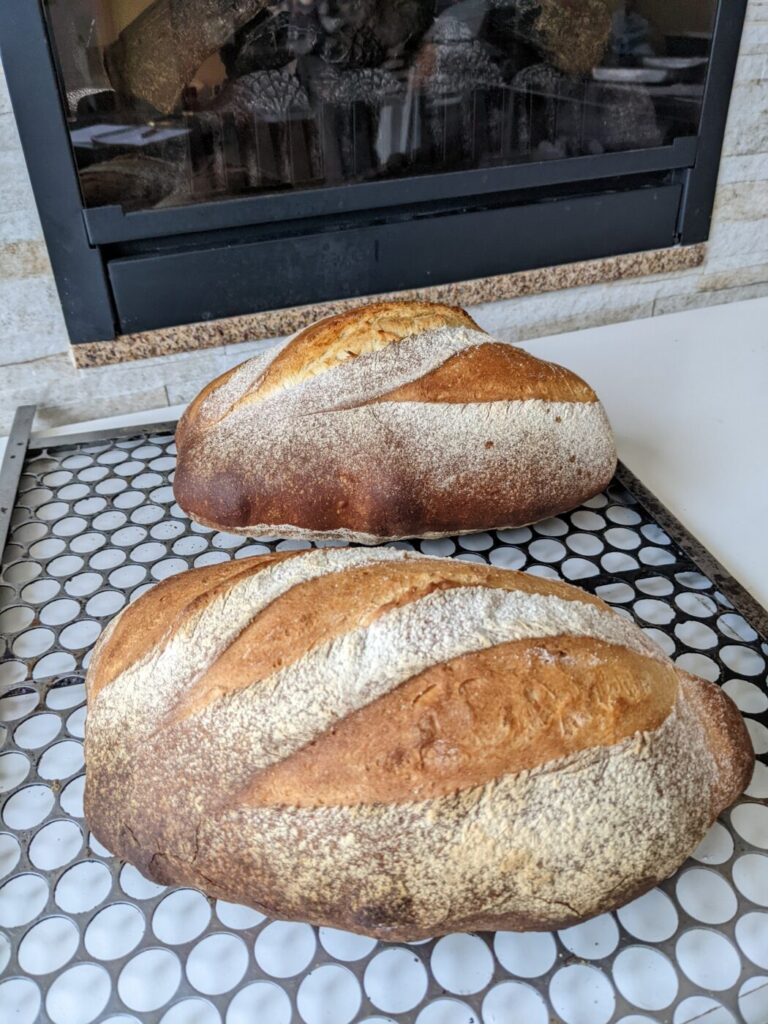
Recipe here.
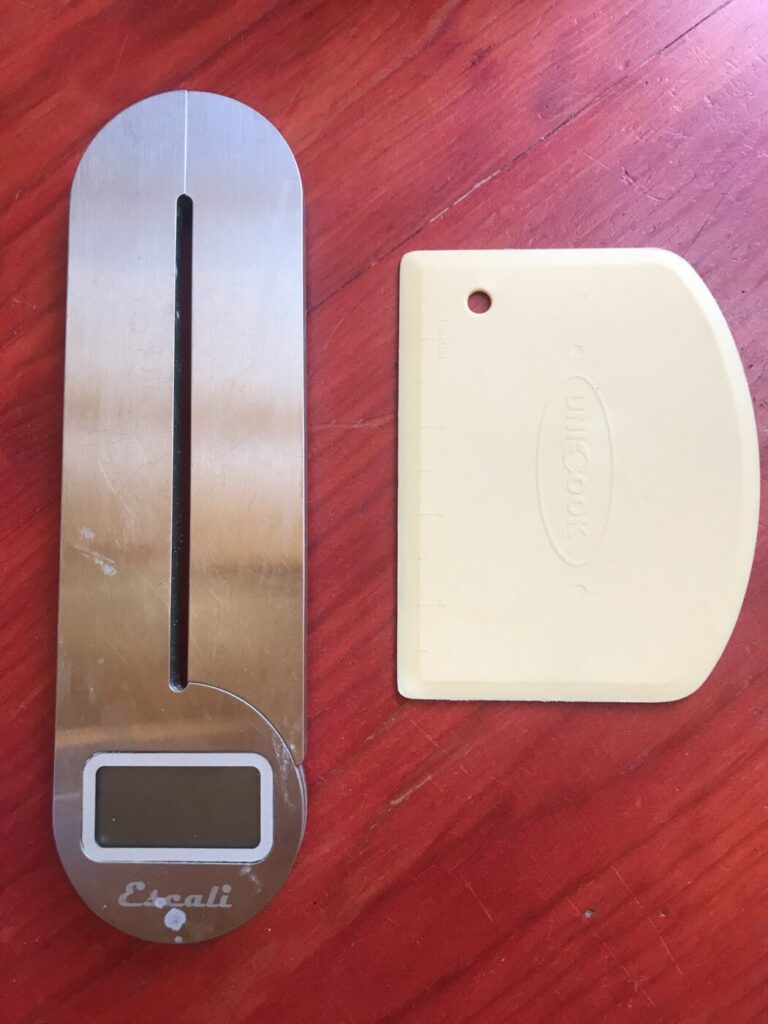
What to Pack: Digital Scale and Bread Scraper
I proiritize packing light. So I only recommend bringing what you can’t live without, can’t easily find or borrow, and can’t accomplish in some other way. After running through the kitchenware I use to make bread I was able to narrow it down to two recommendations.
Digital Scale. Buy a foldup travel version. It’s the best way to accurately measure ingredients. It also substitutes for all measuring cups and spoons (which will often be missing or different from American measures). You can simply Google any ingredient’s volume-to-weight conversion (i.e. brown sugar cups to grams). Here is the one I use.
Bread Scraper. This simple piece of plastic is a versatile instrument that takes up virtually no space in your backpack. If you don’t already have one, get one.
What Not to Bring
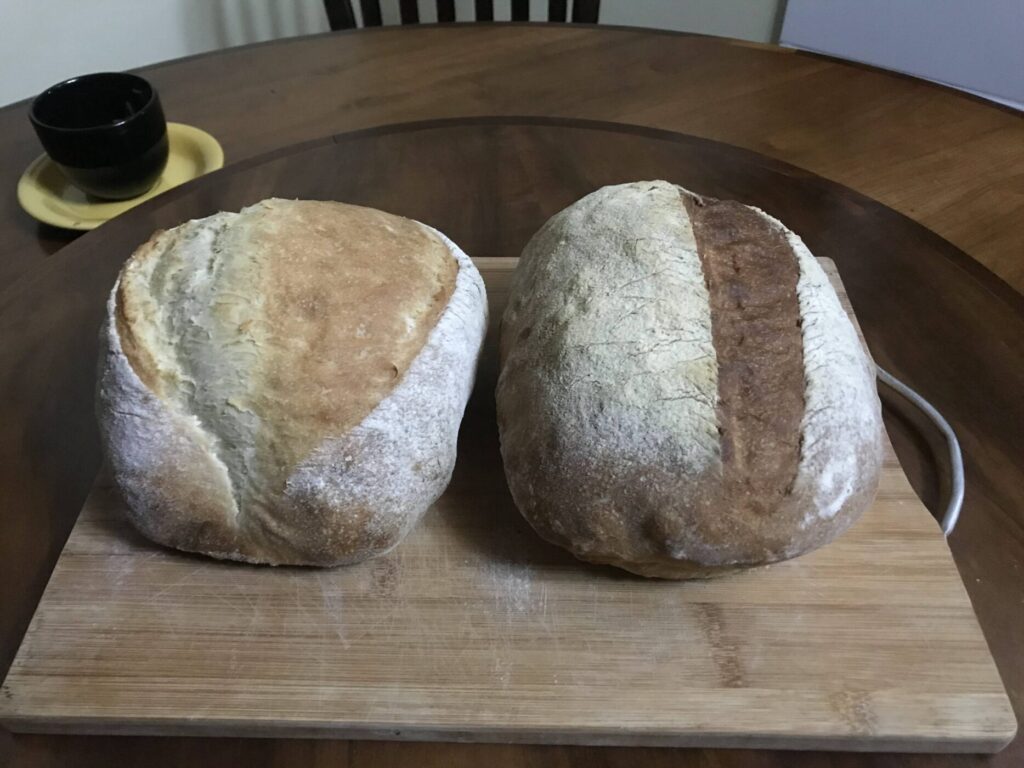
Bread Tin. You don’t need a bread tin to make beautiful bread. This is a waste of precious space. Make a “bloomer” or free-form loaf instead.
Mixing Bowl. Most kitchens will supply this. Surprisingly, some don’t, in which case use a big pot.
Baking Stone. A critical item that you’ll certainly almost never find in a rental kitchen. But who wants to travel with a frigging stone in their backpack? Do I also have to tell you not to pack your oven?
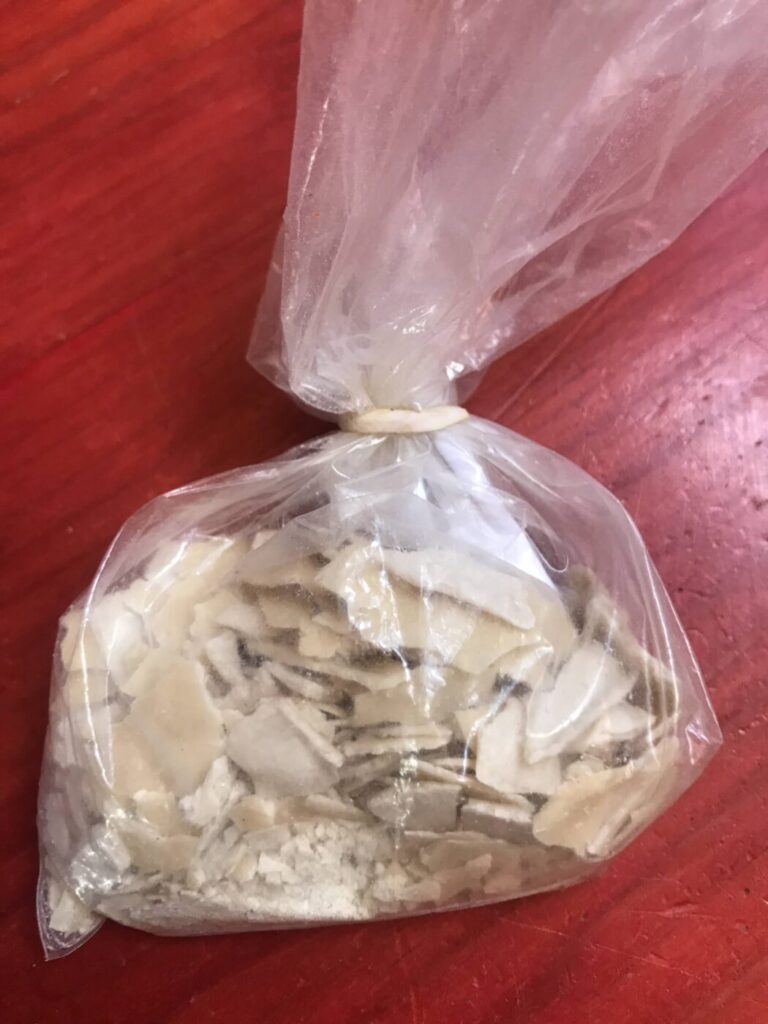
Dry Your Sourdough Starter
My sourdough starter’s name is Joe. When we initially cast around on Facebook for a friend willing to share their starter, we got two, and had to distinguish them somehow. I named them after their previous caretakers: Caris and Joe. Eventually, I just kept Joe.
Technically, wet sourdough starter is allowed on flights. But I prefer to pack lightly and simply. And the TSA agent has the final word. So to avoid the horror and grief from watching a TSA agent discard Joe, jar and all, I dried him. It’s relatively easy to dry and reactivate sourdough starter. Here is the guide I use. It has worked for me every time.
Don’t forget to keep a specimen back home in a dry place so you have it when you get back!
What to Do If You Don’t Have…
The biggest challenge to making bread while traveling is lacking the perfect tool for the job. But part of the fun is being resourceful and challenging yourself to use your knowledge of bread to create the perfect workaround.
Here are some of the most common things I’ve found to be missing and how I overcame them.
A Baking Stone or Dutch Oven
This may be one of the difficult ones to overcome and may take some trial and error before you get it right. But it is possible to create a beautiful loaf of bread without a baking stone or Dutch oven. So don’t throw up your hands in defeat just yet!
My first recommendation, depending on how long you plan to stay in a place, is to consider buying a stone. We stayed for almost five months in Brazil — you know, the place where Brazilian soapstone comes from! People were hawking them on the side of the road for $20 (they cost around $100 in the US). I picked one up and made bread the easy way. I sent it home with a relative before we took our next flight.
If a stone or Dutch oven is not feasible for you, don’t give up.
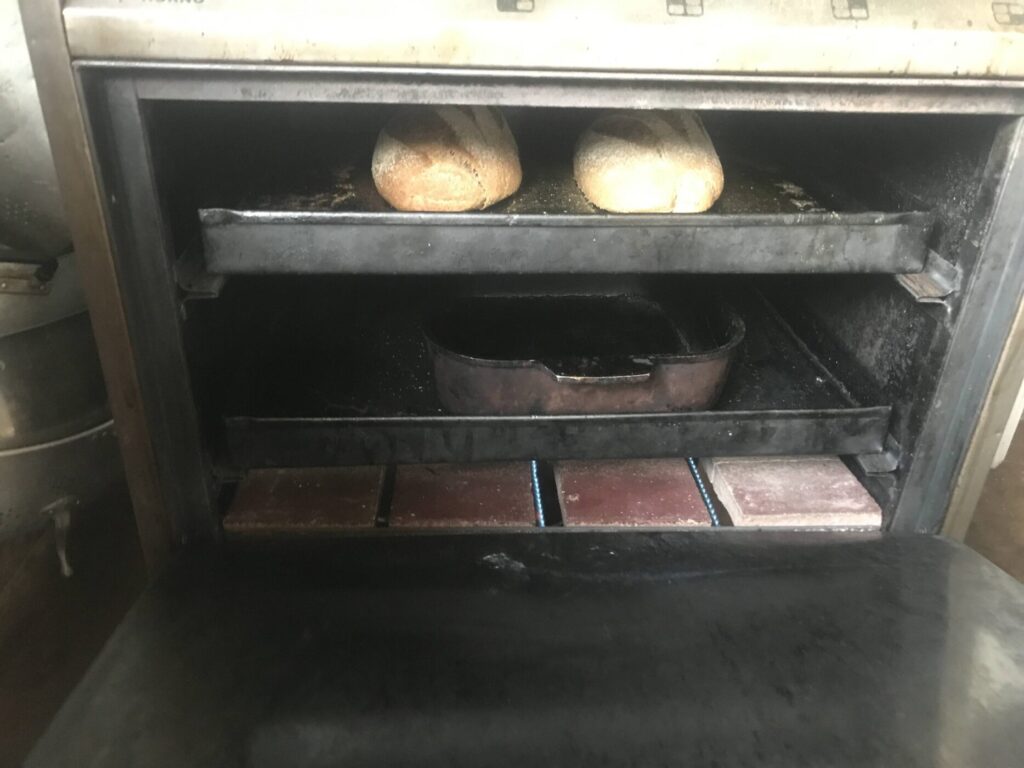
If you can find a heavy ceramic dish (not glass), preheat it when you preheat the oven. This will act more or less like a baking stone.
If all you have is metal baking trays, or even just a cake tin, find the heaviest one at your disposal. You will need to make it non-stick using parchment paper (or see alternative). No need to preheat since metal will rapidly conduct the heat. Place it on the middle shelf. Your first loaf is your experiment. If the bottom burns before loaf is finished, try moving the rack higher or use a larger water tray directly underneath to regulate the heat. If the bottom is underdone, lower the tray, and move the water tray so that it is not directly underneath. You may need to revise your layout and your oven temperature a few times before you achieve an even bake.
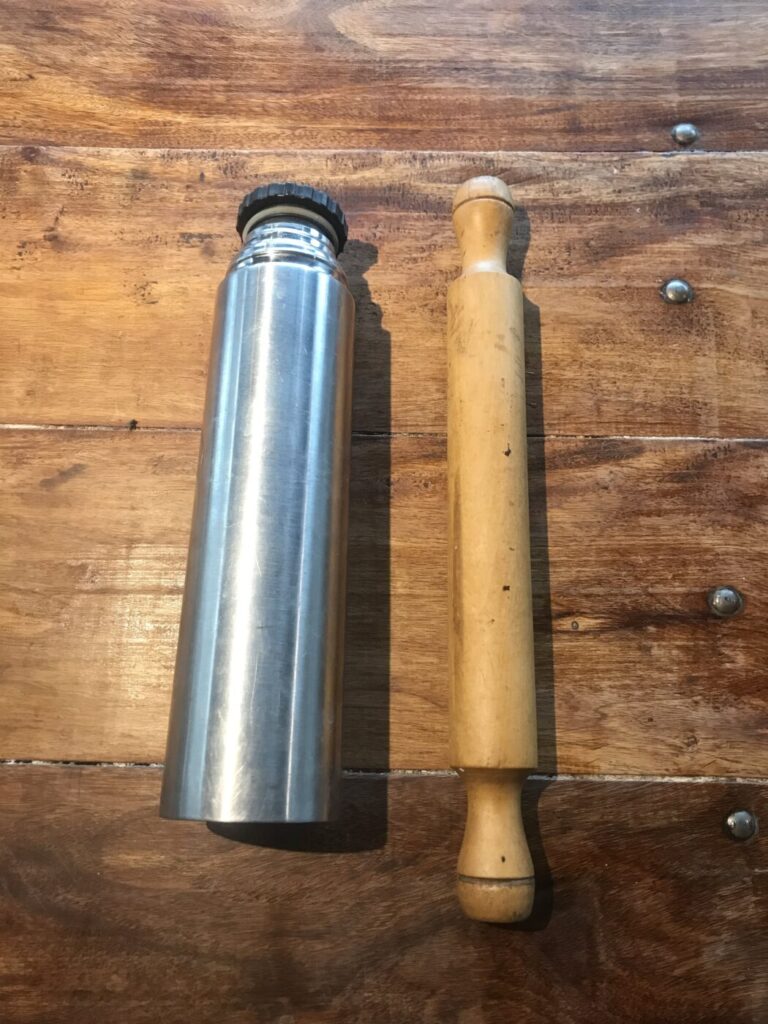
A Rolling Pin
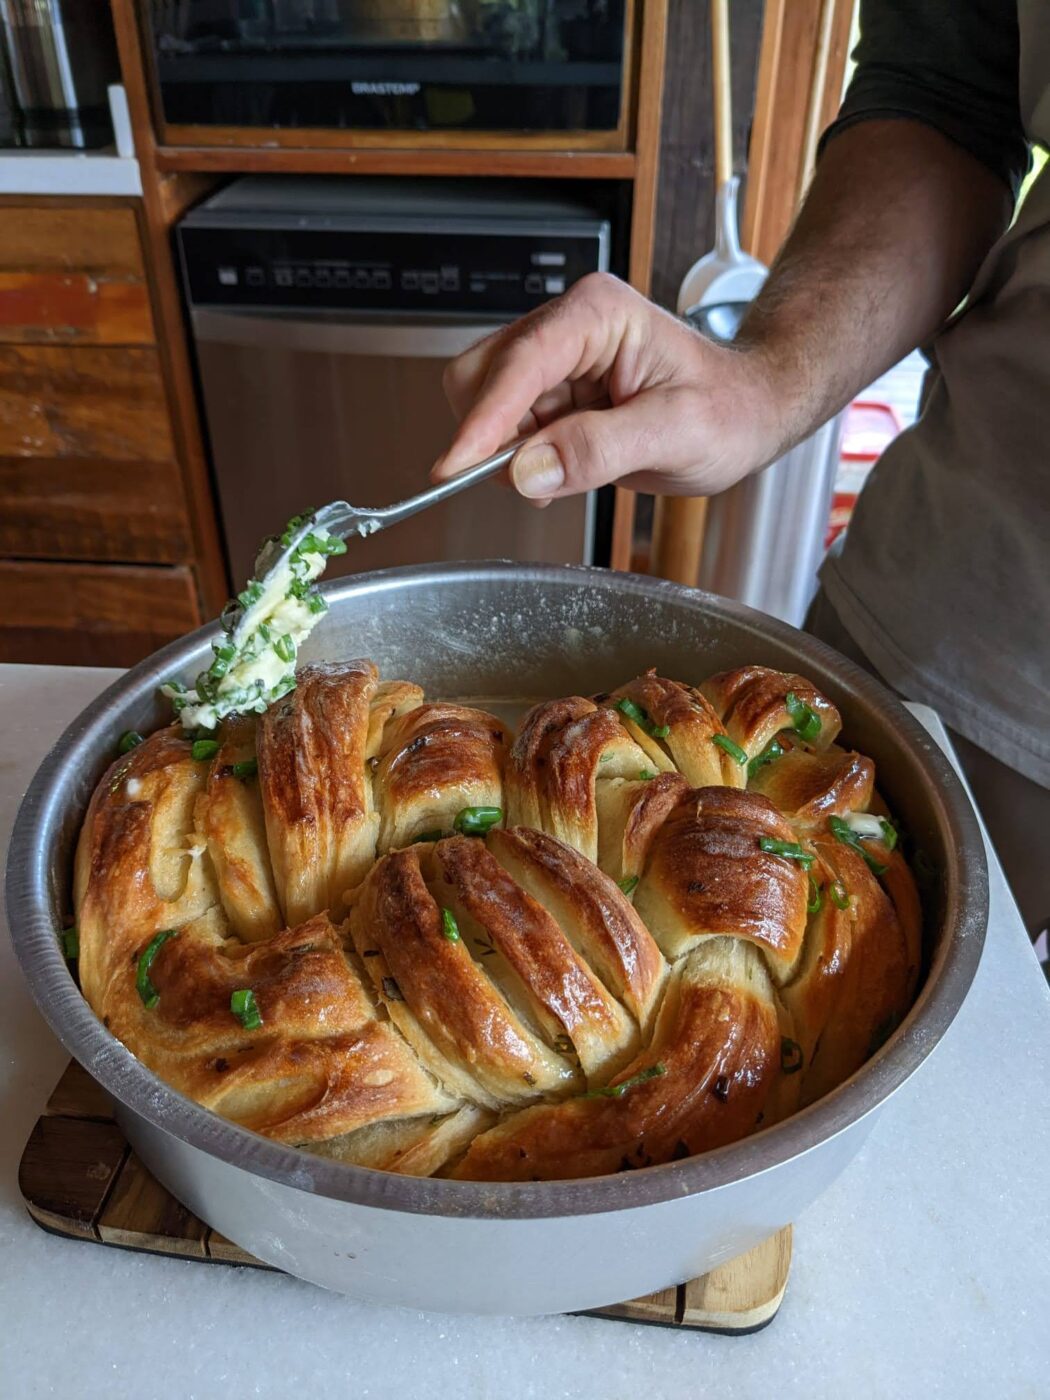
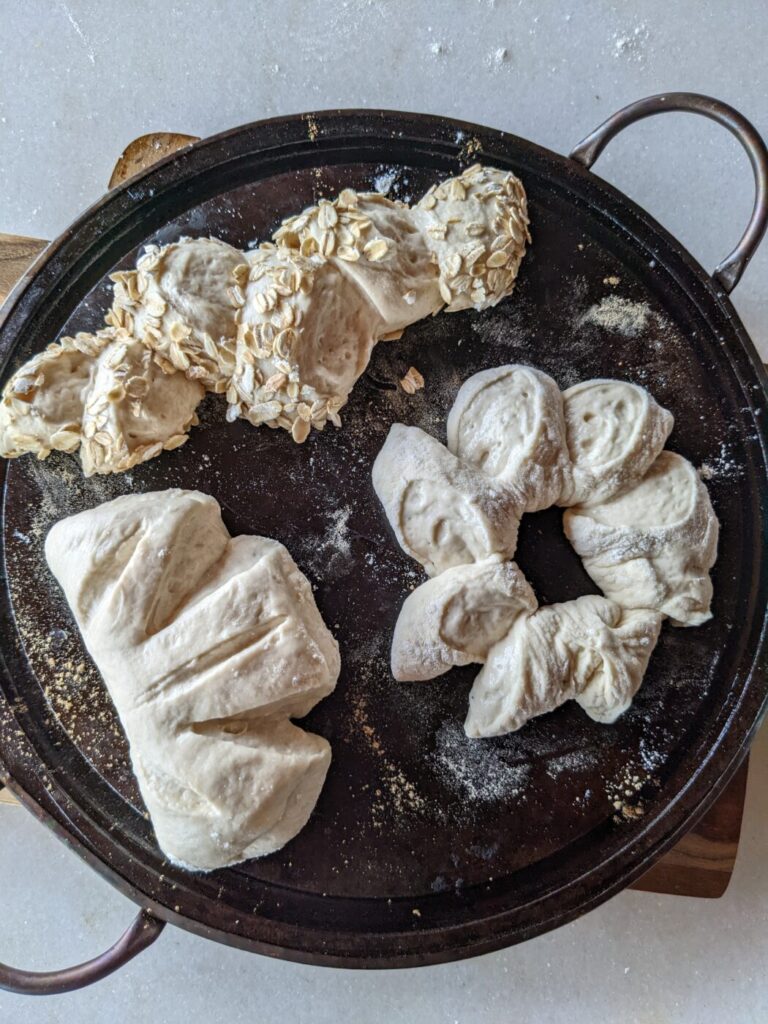
You may need a rolling pin if you want to make cinnamon rolls, for example. Instead of a rolling pin, use a tall thermos or water bottle. Make sure to dust it well with flour!
A Gringette / Lame
For slashing bread, you can use any serrated knife or a breadknife for longer slashes. For more intricate slashes (like wheat stalks), a utility knife blade works. The latter might not be available in most vacation rentals, but if you are volunteering on a working farm, this should be easy to obtain.
A Bread Tin
A bread tin’s a bread tin. There isn’t really an adequate replacement. However, you don’t really need a bread tin to make a beautiful loaf of bread. Make a bloomer instead!
A bloomer is shaped exactly the same as a tin loaf, but you just bake it freeform on a flat surface.
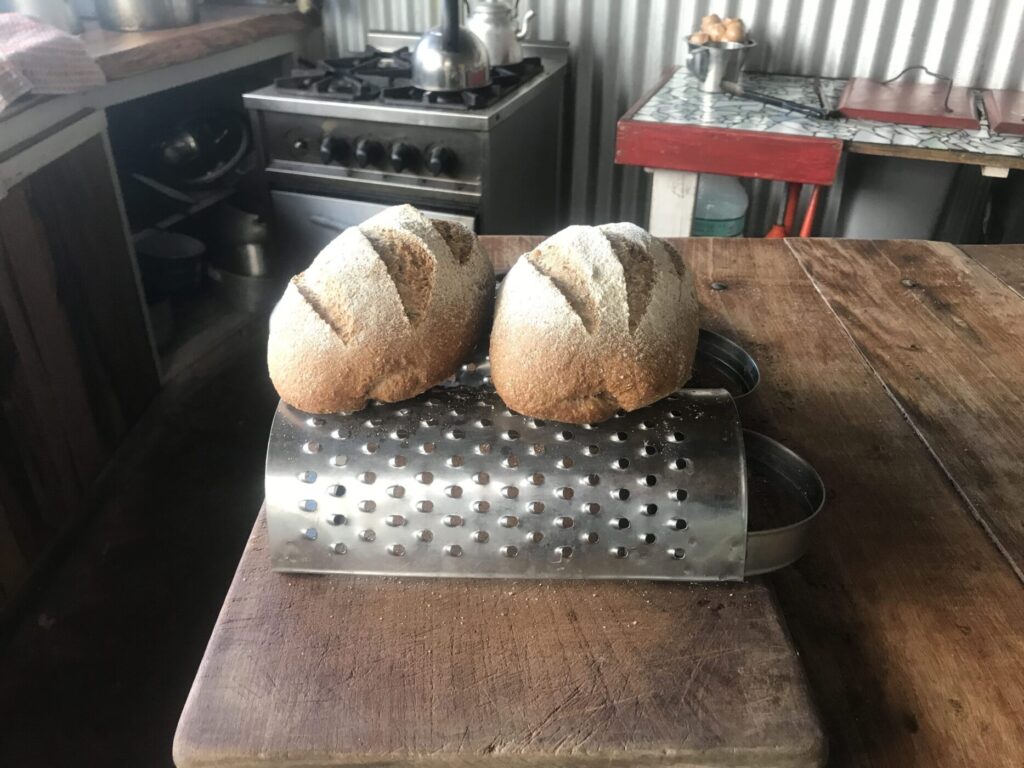
A Cooling Rack
Amazingly, not a single vacation rental we’ve stayed at provided a cooling rack! This despite having other baking ware.
The key to cooling is to expose every surface, including the bottom, to air. This prevents the steam from getting trapped underneath, leaving you with a soggy bottom. And you know how Mary Berry feels about those.
Option 1: Use the Oven Rack
One option is to use the oven rack itself. For bread, this has the additional benefit improving the crunchiness of the crust. If crustiness is the desired outcome, turn off the oven and prop open the door just a crack with a wooden spoon. If you are making something with a more delicate crust, open the door all the way and, if possible, slide the rack out as far as it will go. Just be aware of children and clumsy adults when leaving the hot oven open.
Option 2: Build Your Own Rack
Sometimes you can’t use the oven rack, either because the shelf is a solid piece of metal, or your partner needs to use the oven right away to grill butternut squash. In any case, you’ll need to get creative.
Anything metal and protrudes off the table, preferably with holes, will work. Metal conducts heat allowing it to cool. Holes will give it more air exposure giving the steam somewhere to escape.
The top of a colander can work. I’ve also made use of a set of large curved graters to get the job done. If nothing else, you could line up a bunch of forks.
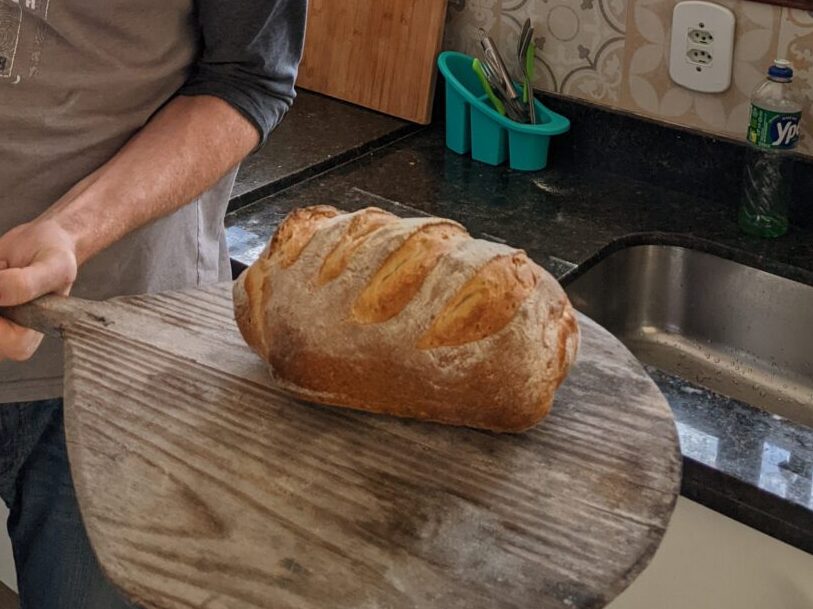
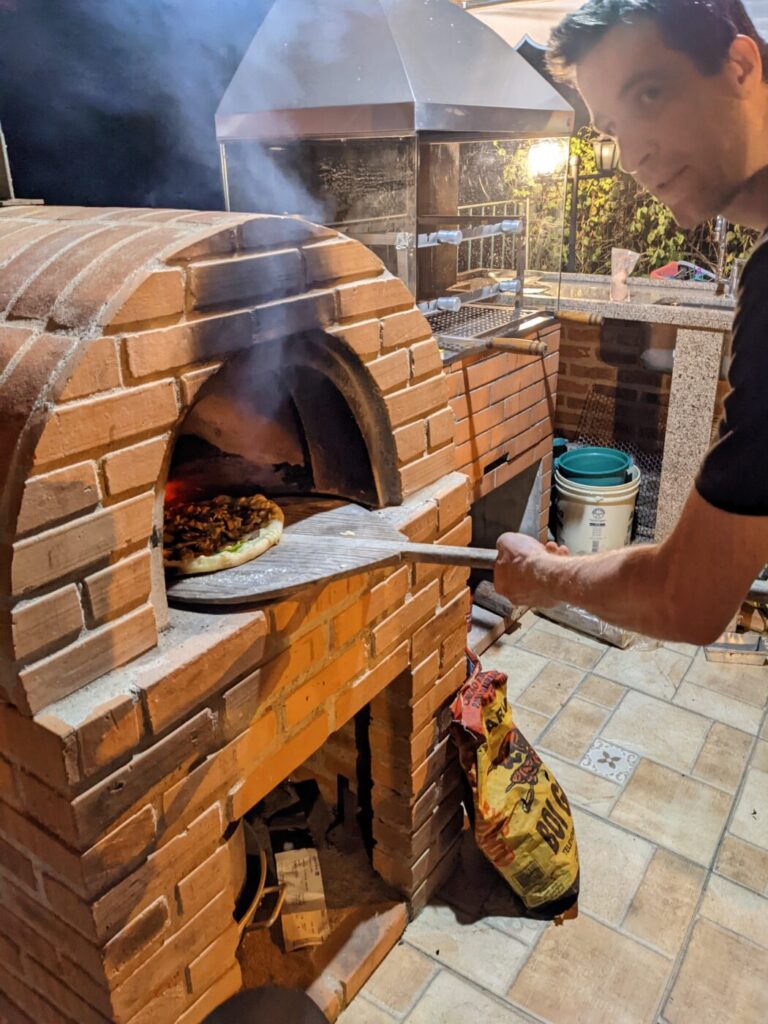
A Bread or Pizza Peel
How does one get a gelatinous dough blob into the hot oven without burning your fingers?
One inferior, but adequate, replacement is a cutting board. Yes, it might have to drop half an inch (the reason I’d rather use a peel), but I’ve never had it cause a major problem.
For pizza, parbaking solves this problem. Lay out the crust on your hot stone, or metal tray, outside of the oven. Put the stone or tray in the oven and bake until it sets (about 2 minutes in a sufficiently hot oven). Remove it before it browns. Now you have a solid crust on which to place your toppings and slide into the oven with ease.
Parchment Paper
Parchment paper: the magical interface between sticky dough and everything else. The mitigator of disasters like torn bread bottoms and raw pizza dough getting stuck to the peel.
In Brazil and Argentina, where we’ve traveled so far, parchment paper is called papel manteiga (Portuguese) / papel manteca (Spanish), or paper butter. It was awful. I may as well have used a sheet of notebook paper. The flimsy paper ended up charred and conjoined with the bottom of the loaf, forcing me to have to scrape it off with a serrated knife. From then on, I figured out how to bake without parchment paper.
For stone baked bread, all you need is enough flour on your peel to make it slide. It will not stick to the stone.
For baking on a metal surface, cover with a hearty film of oil, no puddles, and then dust with flour. You can use olive oil, butter, or any other common cooking oil depending on what goes best with the flavor.
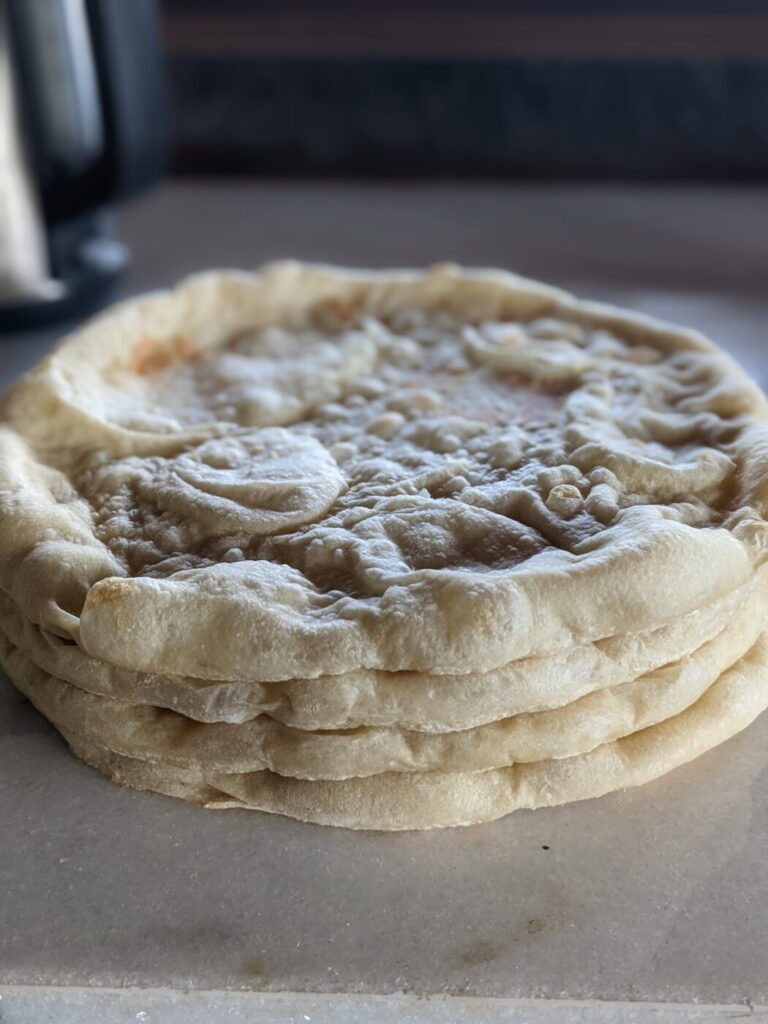
For pizza, you could dust the peel with enough flour to not slide. Another good option is to parbake crust before adding ingredients. This is done by baking the crust in advance until it sets (about 2 minutes in a sufficiently hot oven) without toppings. Then you add your toppings to an already solid crust.
I parbaked sixteen crusts for my “top-your-own-pizza” party. While this meant I couldn’t perform my pizza dough tossing in front of the crowd, it also meant I didn’t have any dough sticking disasters slowing down the process for my hungry guests.
Avoids the sticky crust catastrophe.
Pizza crust recipe here.

Plastic Wrap
You can probably find plastic wrap wherever you go. But chances are, if you are traveling long term, you’ll never use up a roll by the time you move on the next place. Wouldn’t it be nice not to have to carry one more thing around? Well, you’re in luck.
Any recipe that calls for you to cover your dough with plastic wrap will work with any solid, airtight thing covering the bowl. So cover your bowl with a plate, a tray, a cutting board, a pot lid, or another bowl. No more throwing away square films of plastic.
How to Succeed With a Rudimentary Oven
Now for the biggest challenge of them all. What do you do with rudimentary oven?
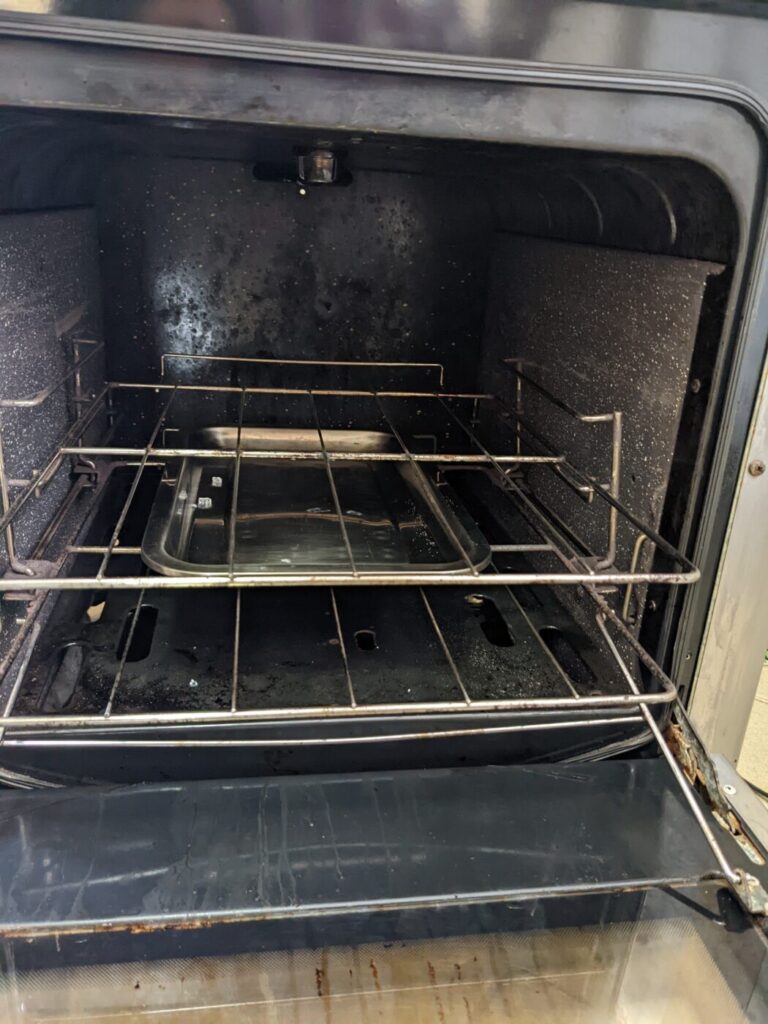
What am I referring to? In all the places we’ve traveled so far in South America — Brazil, Argentina, Uruguay — only one place supplied an oven where you could trust the temperature setting (thank you Eco Caminhos Ecolodge).
The typical oven we’ve encountered is some variation on the same theme: an array of gas elements at the bottom, supplied by a small external gas canister. To light it you remove a sheet of metal to get down to the element, and then wave a match around, sacrificing your finger hairs in the process.
Whether or not the temperature dial has actual written temperatures or not is irrelevant. The heat depends on the gas pressure and how long you have it on. Some ovens seemed like they could melt themselves down if you left them on long enough. Others never even reached 350°F / 180°C (I could tell because my cinnamon rolls took 45 minutes instead of the usual 25 minutes).
Some were tiny, with not enough clearance to bake a full 2lb. loaf of bread. Others were monstrous. All of them were terrible at distributing heat, blow torching the bottom while doing nothing on the top.
So would I recommend not even trying to bake anything under those conditions. Not a chance!
This is how I regularly made great bread and other baked goods even with the most rudimentary ovens.
Treat Your First Loaf as an Experiment
Just accept it. Your first loaf might not turn out well. Treat it as an experiment. Note what happens so next time you can adjust.
I typically start out with the oven on full blast. I think it’s easier to underbake a loaf than overbake it. I only turn it down if it seems to be entering the danger zone (like the plastic knobs are starting to melt off; use your judgment). Take note of how long it takes to bake. Check after ten minutes. Is it already browning? It shouldn’t be. Lower the heat a quarter turn next time.
Take note of how the top and bottom bakes. Does one finish before the other? This will help you adjust your technique for the next loaf.
Never Bake on the Bottom Right Over the Flame
Speaking of experiments… One of the ovens had a layer of bricks over the gas element (you had to remove them to light it). I thought to myself, that’s just like a baking stone! So I put my loaf straight on the bottom solid metal tray. What happened was amazing. It torched the bottom layer of bread so thoroughly that it detached from the loaf in one solid layer, like the sole of a shoe if it were made out of charcoal. Then it charred the bottom of what remained of the bread.
So, rule of thumb: always go for the middle tray.
Use Your Water Tray to Regulate Heat Distribution
Hopefully, you already use a tray of boiling water during your bake.
Did you know that you can also use it to regulate the temperature? Liquid water acts as a heat barrier, limiting the temperature that can emanate from that zone to water’s boiling point.
If your bread is getting torched from the bottom (because, say, you’re baking on a metal tray), try increasing the size of your water tray! You could also adjust your water tray’s position. Try moving it from directly underneath if it seems like you’re not getting enough heat.
Use the Best Baking Surface You Can
If you can get your hands on a baking stone, this will make the heat distribution problem much easier to deal with.
Consider using other similar materials. Have a few [clean] bricks lying around? A twelve-inch unglazed ceramic tile? Those of you back home can gasp all you want. If I could order a stone for $20 on Amazon and get it the next day, I would. A dude’s still gotta eat bread.
After that, a heavy ceramic dish isn’t too bad.
If you have none of those, choose the heaviest metal tray you can find and go for it.

Rely On Observation, Not Time
Without the benefit of a consistent, known temperature, you can’t just set a timer and forget it like you can back home. You must frequently observe its progress.
What you’re looking for is a dramatic rise and no crust in the first ten minutes. If you’re already forming a crust in that time, turn it down! You will finish your crust before you baked the inside.
After that, you want finish browning your crust in the next 20 to 50 minutes. I take a peek every five to ten minutes. If after 30 minutes (including the first ten) I see no sign of browning, I might turn up the heat. Or if it’s as high as it’s going to get, I remove the water tray.
I had one oven take 70 minutes to finish four small loafs (a full 2lb loaf divided into four). The bread came out perfect, but it took way too long. From then on, I stuck to cinnamon rolls in that oven.
Another oven ran so hot that I got a full 2lb loaf done in 35 minutes. That’s ok, but I really had to keep an eye on it so as not to burn it.
Final Thoughts
Despite the challenges, I’ve really enjoyed “nomadic” baking. My family benefits from the results, and I’ve been able to impress my new friends and even inspire a new hobby in some of them.
There is almost no situation where I have not been able to succeed in making a great loaf. Sometimes the first try in a new place is a failure. But each failure is an experiment that teaches me something new. Rarely are the failures not edible.
Practicing my skill under non-ideal conditions refines my instincts as a baker. Witnessing the process play out in different environments and climates deepens my appreciation for the magic alchemy of water, flour and yeast.
Recipe here.

Written and illustrated by the authors of this blog.
A Book for Little Travelers
A True Story From Our Gap Year